Module 4: Point of care ultrasound in first trimester abortion (POCUS)
6. Procedures
Some useful background information is available here: www.youtube.com/watch?v=S8AWts0oTnw
Abdominal scan versus transvaginal scan
Transvaginal scans can provide a higher level of clarity and can be used at earlier gestations. However, for the purposes of this training, only abdominal scanning will be considered as this is less invasive and easier to perform and requires less advanced ultrasound machines.
The quality of trans-abdominal scanning depends on many factors, including body habitus, fullness of the bladder and the uterus position. These are not major factors when transvaginal scanning.
Typically, in order to see a gestational sac using an abdominal probe, βhCG levels would need to be at least 3,500 MIU/L, compared to level of only 2,000 MIU/L for a transvaginal probe. In clinical terms, this means that transvaginal scanning will identify a sac 2 to 3 days before abdominal scanning. All other features of pregnancy will be seen equally earlier in transvaginal scanning.
The quality of trans-abdominal scanning depends on many factors, including body habitus, fullness of the bladder and the uterus position. These are not major factors when transvaginal scanning.
Typically, it should be possible to identify a gestational sac in the uterus at βhCG levels of 2,000 MIU/L with a transvaginal probe, whereas levels of at least 3,500 MIU/L will be necessary before a sac can be seen using an abdominal probe. In clinical terms, this means that transvaginal scanning will identify a sac 2 to 3 days before abdominal scanning. All other features of pregnancy will be seen equally earlier in transvaginal scanning.
The ultrasound examination
Click here to access a video explaining the basic uterine ultrasound technique.
1. First introduce yourself to the patient and explain the ultrasound procedure and obtain their verbal consent. The patient should then be asked to lie in a supine position with legs flat (on an examination bed or couch). Then expose the abdominal area (taking care to cover any exposed areas that are not needed for the examination). Tuck paper towel tissue into pant line to ensure gel does not get over the patient’s clothes. Check with the patient if they would like to see the images or not. Then explain that the gel may feel cold and that the probe will apply pressure. Ask them to tell you if they are uncomfortable at any time.
2. Apply gel to the skin over the area for examination – this gel eliminates air between the probe and the skin to help pass the sound waves into the client’s body. It ensures clearer images and easier gliding of the probe over the patient’s skin for user ease.
3. Place the probe on the mid-line of the suprapubic abdomen area, just above the pubic bone, with the probe marker facing the patient's head. Pointing or rocking the transducer into the pelvis towards the patient's feet may be needed to bring the uterus into view (Figure 2). Adjust the depth and gain to improve image clarity. Then slide the transducer to the patients left or right so that you look through the entire three-dimensional uterus in this plane. Gentle pressure can help to compress bowel gas that may obscure your view.
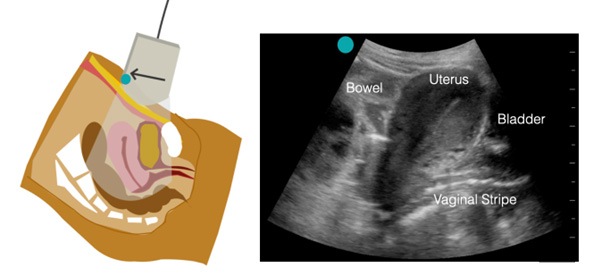
Figure 2. Longitudinal orientation of the ultrasound transducer
Images provided by Dr Sierra Beck.
4. Repeat the above step with the probe in the transverse position (Figure 3) - rotate the probe 90 degrees counter-clockwise with the probe indicator facing towards the patients right. Using the bladder as your landmark, slowly fan through pointing the probe up towards the head and then towards the feet to identify the bladder and uterus and locate the pregnancy. Follow the same steps as you did in longitudinal position if you are having trouble locating the pregnancy. Freeze/screenshot in the same way.
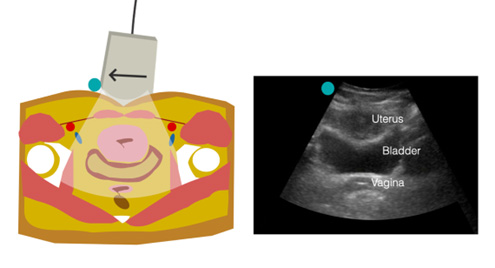
Figure 3.
Transverse Orientation of the ultrasound transducer anteverted uterus wraps around the top of the bladder.
Images provided by Dr Sierra Beck.
5. Once you have identified a gestational sac within the uterus – assess whether you see a yolk sac and a fetal pole (Figure 4). A yolk sac must be sighted within the gestational sac to confirm an intra- uterine pregnancy (IUP). Freeze/screenshot the image once you have identified the gestational sac with yolk sac and fetal pole if sited.
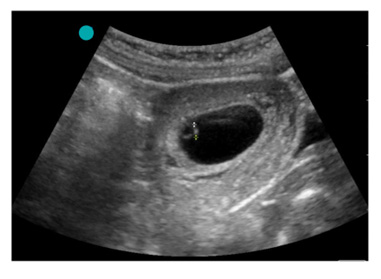
Figure 4.
Representative Longitudinal Image of a 6 week IUP with a yolk sac and fetel pole seen within a gestation sac. Calipers are also depicted, measuring crown rump length (see later).
Image provided by Dr Sierra Beck.
6. If a fetal pole is seen, measure the crown rump length (CRL) (see later). If only a gestational sac is seen with or without a yolk sac, measure the gestational sac. N.B. CRL measurements are more accurate than gestational sac measurements. An IUP is not confirmed until a yolk sac or fetal pole is seen within a gestational sac.
7. After the images have been acquired and measurements taken, the data is stored on your device. You may transfer the saved image to your patient management software or get a hard copy of the images for notes.
8. Give the patient a towelette to clean up/wipe off the gel. They will then dress and can discuss the results.
Points to consider during ultrasound procedure
- Full bladder – A full bladder is the best tool to help you to find the uterus, thus – the pregnancy. A full bladder pushes the uterus up towards where you will put the transducer displacing the bowel and providing a sonolucent window into the uterus. If a patient who has a full bladder with a retroverted uterus, it can sometimes be more difficult to get clear images of the uterus – they may need to empty their bladder slightly if is too full.
- Depth – Checking the depth of the ultrasound. Most machines will let you adjust the depth to which the scan will penetrate. Generally speaking, you should have the depth set deep enough to see all of the uterus, but not so deep as to scan way past it as you will lose resolution. Not every patient is the same so depth will need to be adjusted for body size and position of the uterus (ante-verted vs retroverted). Trans Abdominal scans may be pre-set to 10-12cm, you may need to increase your depth to 15cm to get started, then you can adjust as required.
- Having enough gel – Gel should be used to ensure clearer images and easier gliding over the skin
- Bearings – Using the patient’s pubic bone as a point of reference (Figure 5). This will appear as a shadow cast at the most caudal part of the scan (the part nearest the foot end of the patient). Fan through (staying in one position pointing the transducer left and right) with the pubic bone shadow showing. If you cannot view all of the uterus, you can then tilt the probe higher in the pelvis.
- Fluid on ultrasound appears black in colour – This includes the gestation sac. An IUP cannot be confirmed until a yolk sac and/or fetal pole are sited within the gestation sac (the black fluid like structure). A yolk sac is usually sited first within a gestation sac in early pregnancy (see later).
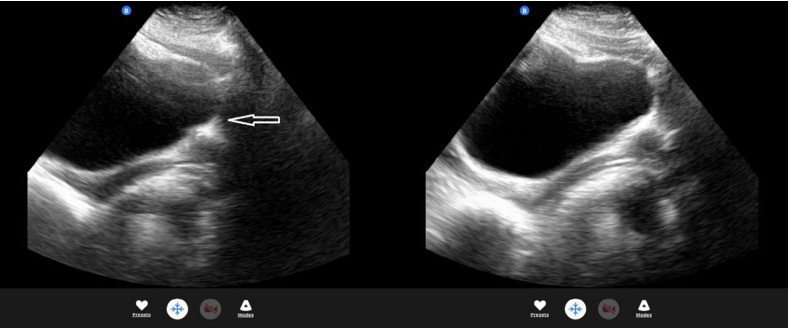
Figure 5. Longitudinal image showing pubic bone shadow on pelvic ultrasound.
Acoustic windows
Air in the bowel scatters soundwaves and limits your ability to see deeper structures. This can be improved with gentle pressure or by imaging the uterus through the bladder. The urine in the bladder allows ultrasound waves to pass through unimpeded (hence it is black on the image). This means more sound waves reach (and returns from) the uterus. If the bladder is not full enough, the size of the "window” through which the uterus can be seen is restricted. If the bladder cannot be filled to perfection, another option is to move the probe to make the most of the Acoustic window.